Quantcast
Channel: CoderzHeaven
Viewing all 526 articles
Browse latest View live

Using Content Resolver to List Contacts – Android

$
0
0

Here is a simple example to list contacts in android using the Content Resolver.

Note :

You need to have two things before accessing contacts.

1. Contacts Permission in the Android Manifest

<uses-permission android:name="android.permission.READ_CONTACTS" />

2. Ask Runtime permission from the user
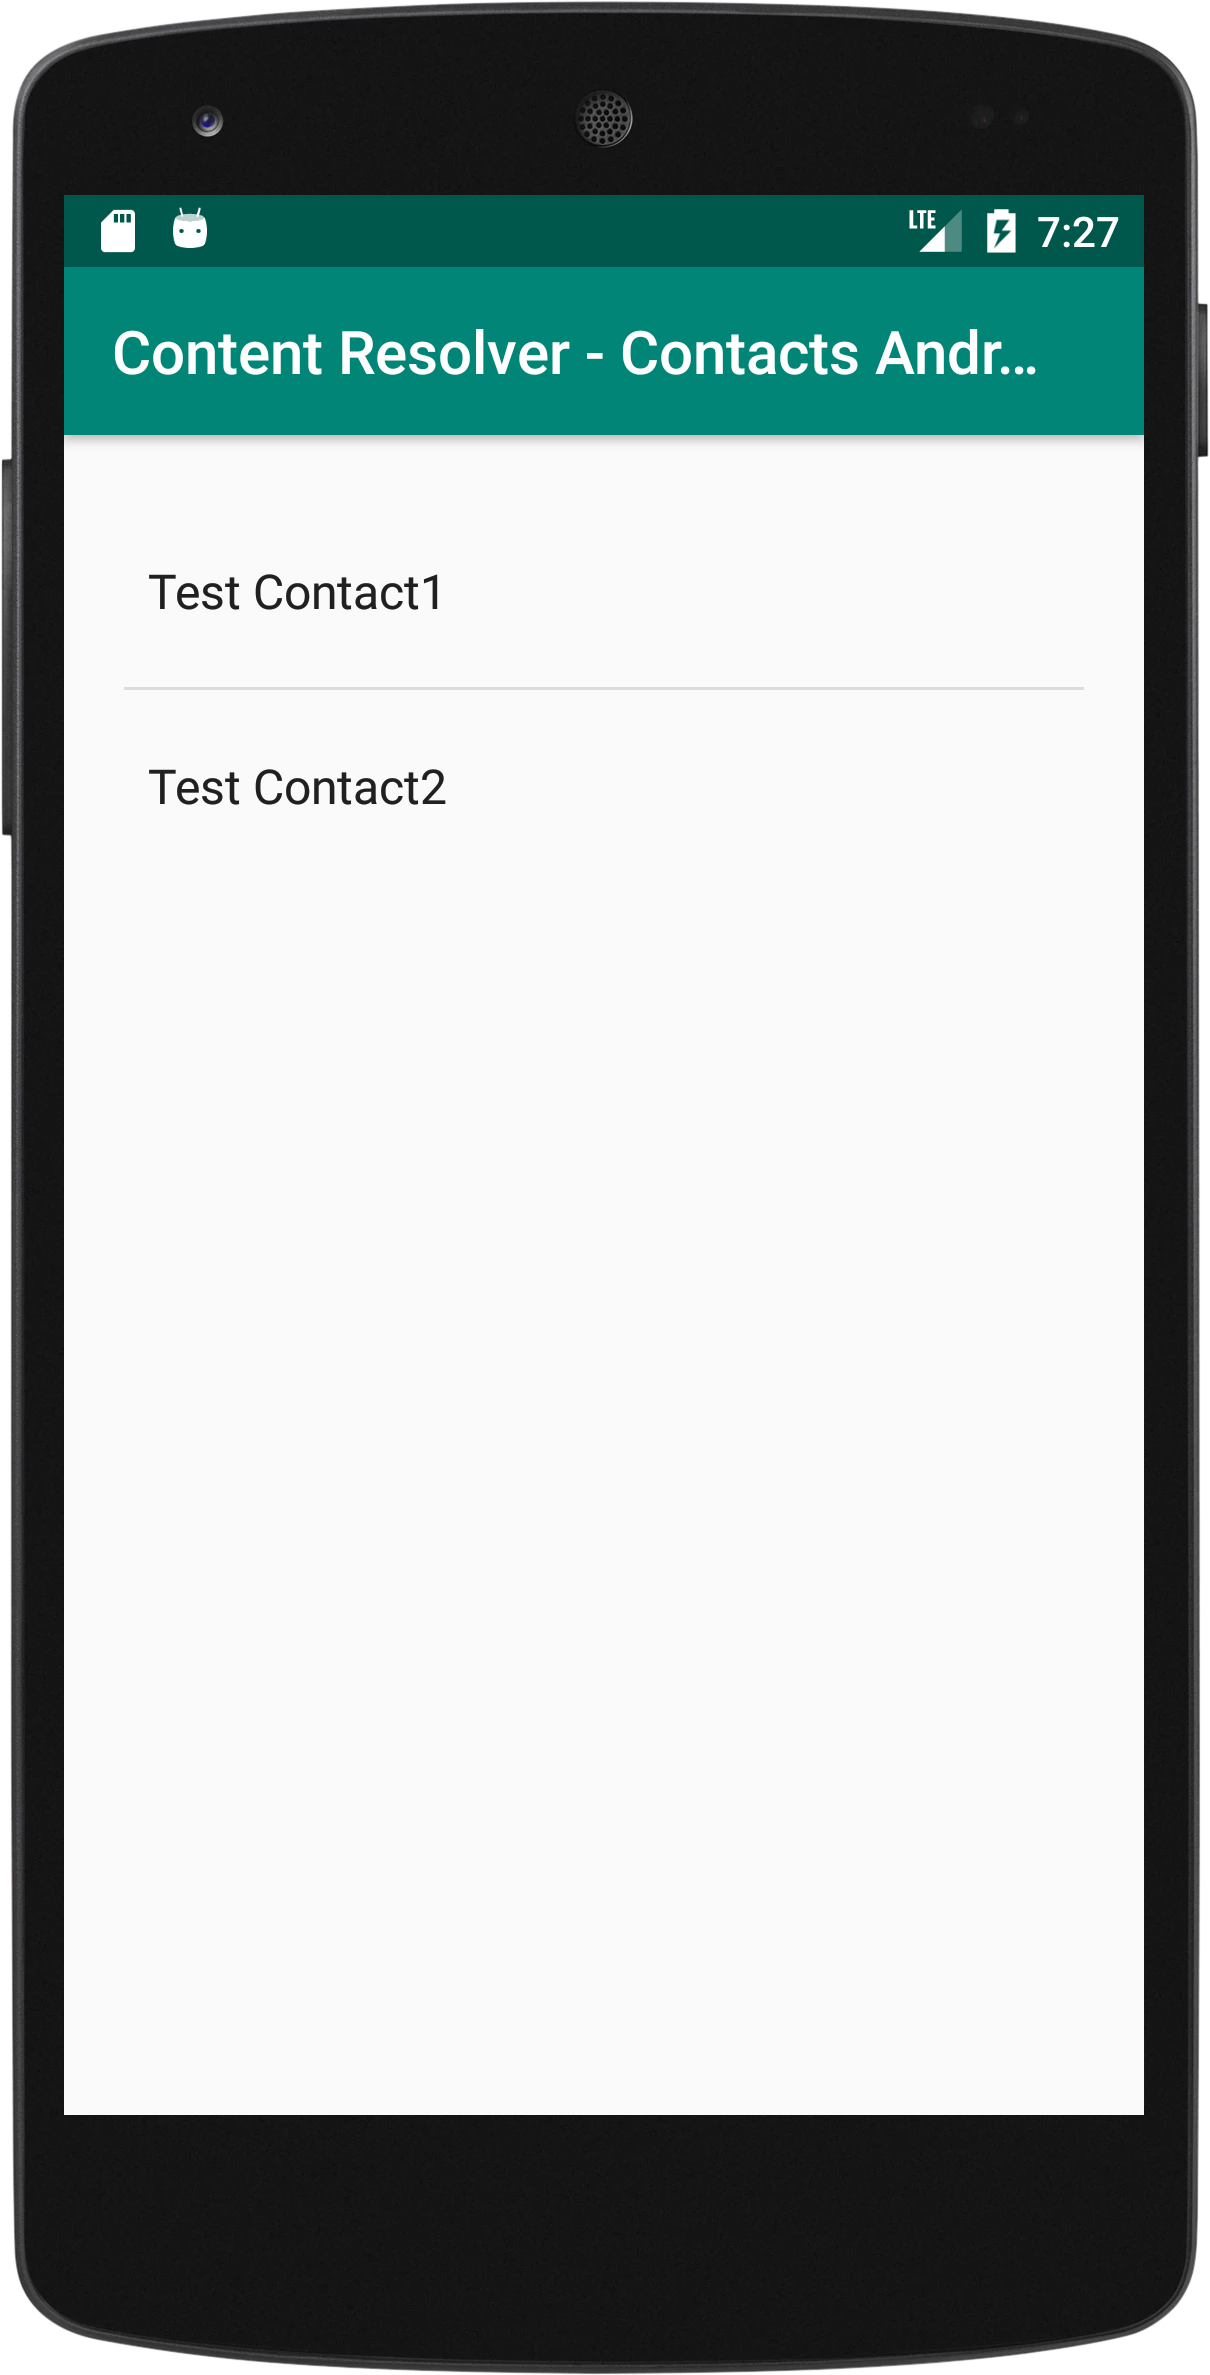
Contacts Android

Contacts Android – Content Resolver

Code

Here is our MainActivity that lists the contacts.

MainActivity.java

package contacts.coderzheaven.com.samplesproject;

import android.content.ContentResolver;
import android.content.Context;
import android.content.pm.PackageManager;
import android.database.Cursor;
import android.os.Build;
import android.os.Bundle;
import android.provider.ContactsContract;
import android.support.annotation.NonNull;
import android.support.v4.app.ActivityCompat;
import android.support.v7.app.AppCompatActivity;
import android.widget.ListView;
import android.widget.Toast;

import static contacts.coderzheaven.com.samplesproject.ContactListAdapter.CONTACT_PROJECTION;

public class MainActivity extends AppCompatActivity {

    @Override
    protected void onCreate(Bundle savedInstanceState) {
        super.onCreate(savedInstanceState);
        setContentView(R.layout.activity_main);
        checkContactPermissions();
    }

    private void setContacts() {
        ContentResolver content = getContentResolver();
        Cursor cursor = content.query(ContactsContract.Contacts.CONTENT_URI,
                CONTACT_PROJECTION, null, null, null);
        ContactListAdapter adapter = new ContactListAdapter(
                this, cursor);
        ListView listView = findViewById(R.id.listView);
        listView.setAdapter(adapter);
    }

    private void checkContactPermissions() {
        if (Build.VERSION.SDK_INT >= 23) {
            String[] PERMISSIONS = {android.Manifest.permission.READ_CONTACTS};
            if (!hasPermissions(this, PERMISSIONS)) {
                ActivityCompat.requestPermissions(this, PERMISSIONS, 100);
            } else {
                setContacts();
            }
        } else {
            setContacts();
        }
    }

    private static boolean hasPermissions(Context context, String... permissions) {
        if (Build.VERSION.SDK_INT >= Build.VERSION_CODES.M && context != null && permissions != null) {
            for (String permission : permissions) {
                if (ActivityCompat.checkSelfPermission(context, permission) != PackageManager.PERMISSION_GRANTED) {
                    return false;
                }
            }
        }
        return true;
    }

    @Override
    public void onRequestPermissionsResult(int requestCode, @NonNull String[] permissions, @NonNull int[] grantResults) {
        super.onRequestPermissionsResult(requestCode, permissions, grantResults);
        switch (requestCode) {
            case 100: {
                if (grantResults.length > 0 && grantResults[0] == PackageManager.PERMISSION_GRANTED) {
                    setContacts();
                } else {
                    Toast.makeText(this, "The app was not allowed to read your contact", Toast.LENGTH_LONG).show();
                }
            }
        }
    }
}

Adapter Class

Below is the adapter class for the Listview in the UI.
We name it “ContactListAdapter.java”.

package contacts.coderzheaven.com.samplesproject;

import android.content.ContentResolver;
import android.content.Context;
import android.database.Cursor;
import android.net.Uri;
import android.provider.ContactsContract;
import android.support.v4.widget.CursorAdapter;
import android.view.LayoutInflater;
import android.view.View;
import android.view.ViewGroup;
import android.widget.FilterQueryProvider;
import android.widget.Filterable;
import android.widget.TextView;

class ContactListAdapter extends CursorAdapter implements
        Filterable {

    public ContactListAdapter(Context context, Cursor c) {
        super(context, c);
        mContent = context.getContentResolver();
    }

    @Override
    public View newView(Context context, Cursor cursor, ViewGroup parent) {
        final LayoutInflater inflater = LayoutInflater.from(context);
        final TextView view = (TextView) inflater.inflate(
                android.R.layout.simple_dropdown_item_1line, parent, false);
        view.setText(cursor.getString(COLUMN_DISPLAY_NAME));
        return view;
    }

    @Override
    public void bindView(View view, Context context, Cursor cursor) {
        ((TextView) view).setText(cursor.getString(COLUMN_DISPLAY_NAME));
    }

    @Override
    public String convertToString(Cursor cursor) {
        return cursor.getString(COLUMN_DISPLAY_NAME);
    }

    @Override
    public Cursor runQueryOnBackgroundThread(CharSequence constraint) {
        FilterQueryProvider filter = getFilterQueryProvider();
        if (filter != null) {
            return filter.runQuery(constraint);
        }

        Uri uri = Uri.withAppendedPath(ContactsContract.Contacts.CONTENT_FILTER_URI,
                Uri.encode(constraint.toString()));
        return mContent.query(uri, CONTACT_PROJECTION, null, null, null);
    }

    private ContentResolver mContent;

    public static final String[] CONTACT_PROJECTION = new String[]{
            ContactsContract.Contacts._ID, ContactsContract.Contacts.DISPLAY_NAME};

    private static final int COLUMN_DISPLAY_NAME = 1;
}

Layout

Finally the layout. The layout is simple, it just contains a Listview.

<LinearLayout xmlns:android="http://schemas.android.com/apk/res/android" android:layout_width="match_parent" android:layout_height="wrap_content" android:orientation="vertical" android:padding="20dp">

    <ListView android:id="@+id/listView" android:layout_width="match_parent" android:layout_height="wrap_content" />

</LinearLayout>

Download Source Code

You can download the full android studio source code from here.

Breaking Records – Problem Solving Question & Answer

$
0
0

Problem Statement

Download or view the problem statement here.

Solution

static int[] breakingRecords(int[] scores) {

    int min = scores[0], max = scores[0];
    int minCount = 0, maxCount = 0;

    int len = scores.length;

    for (int i = 0; i < len; i++) {
        if (scores[i] < min) {
            min = scores[i];
            minCount++;
        }
        if (scores[i] > max) {
            max = scores[i];
            maxCount++;
        }
    }
    return new int[]{maxCount, minCount};
}

How to configure Firebase Google-Services.json for different targets in iOS?

$
0
0

Once you have different Google-Services.json for different targets for your firebase applications, you may be wondering how all can have same filenames and configure for different targets. However the solution is simple.

Initial Steps

* Create new directory for each directory inside for project folder. Make sure the folder name is different from the target name
(you can just put an underscore in front of the target name folder).

* Once you have created all the folders for each target, copy the corresponding Google-Services.json into it. Then Drag each folder to the xcode project directory and check the checkbox for each app.

* Make sure you select each folder and check if it is properly selected for each target. You can click on a folder and on the ‘Target Membership’ tab on the right side, you can see for what target each folder is selected.

Update info.plist

Go to the target info.plist and add one more key to it.
Let’s say it “AppDirectory”, give the value of each folder name for each target.

Lets say your target is “MyApp1” and the folder you created for MyApp1 is “_MyApp1”, the ‘AppDirectory’ value will be “_MyApp1”.

Code

This is how you usually configure the Firebase App.

In Objective C

 [FIRApp configure]

With Different targets, we do like this.

Now open the AppDelegate.m and copy the below function.

 +(void) initFirebase{
  NSString *appDir = [[NSBundle mainBundle] objectForInfoDictionaryKey:APP_DIRECTORY];
  NSString *filePath = [[NSBundle mainBundle] pathForResource:FB_CONFIG_FILE ofType:PLIST inDirectory:appDir];
  FIROptions *options = [[FIROptions alloc] initWithContentsOfFile:filePath];
  [FIRApp configureWithOptions:options];
}

And Call above function in didFinishLaunchingWithOptions

-(BOOL)application:(UIApplication *)application didFinishLaunchingWithOptions:(NSDictionary *)launchOptions{
    [AppDelegate initFirebase];
}

All set. Go ahead and test your app.

Prompt users to rate your app in iOS with StoreKit.

$
0
0

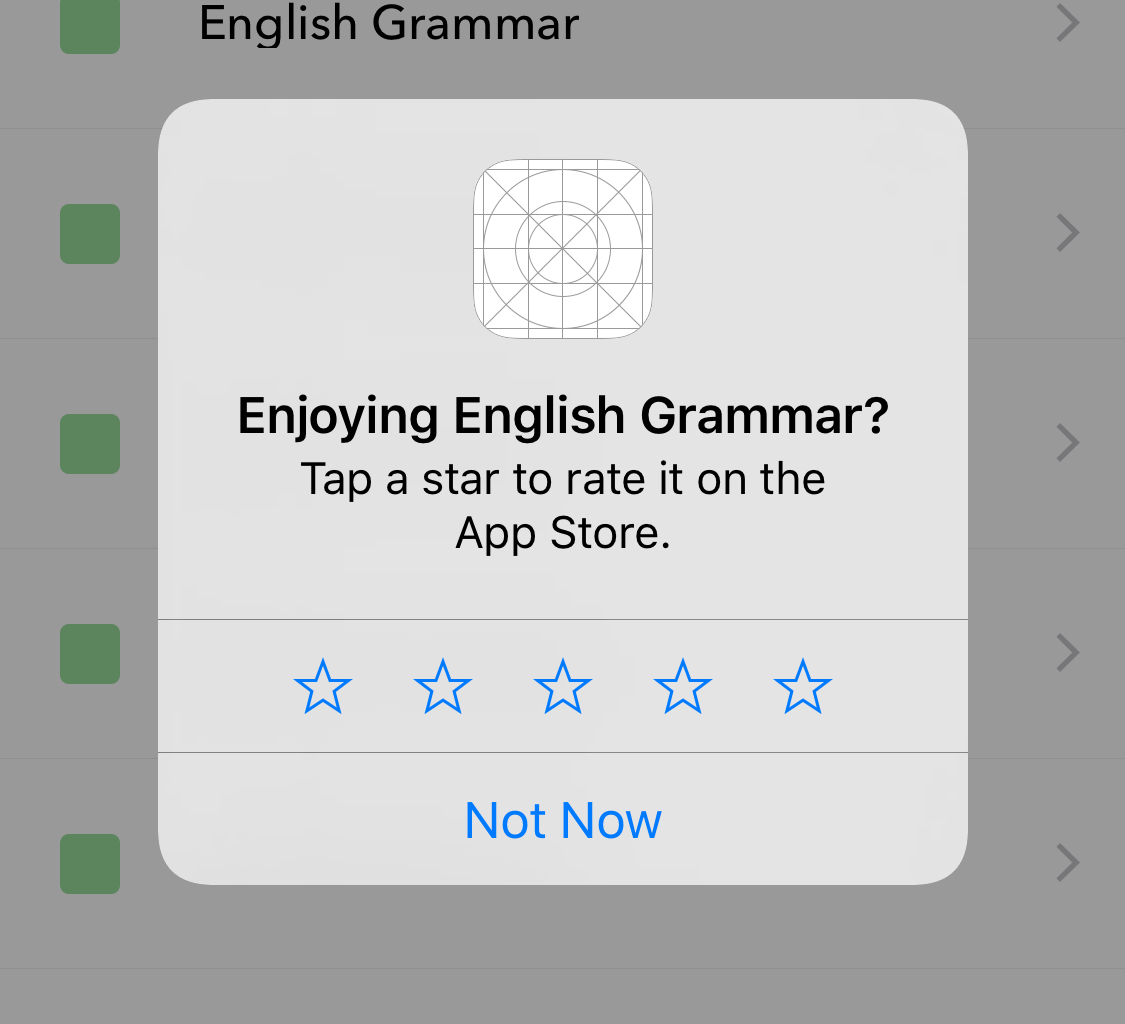
Apple has introduced a new API to allow developers to prompt users with rate their apps directly from the app.

Old way

In the old way, we used to redirect users to the Appstore with the app’s link to rate the app.
This makes users to navigate out of the app. This was not an efficient way to do it.

Sample code will look like this in swift


func rateApp(appId: String) {
   openUrl(“itms-apps://itunes.apple.com/app/” + appId)
}

func openUrl(_ urlString:String) {
  let url = URL(string: urlString)!
  if #available(iOS 10.0, *) {
    UIApplication.shared.open(url, options: [:], completionHandler: nil)
  } else {
    UIApplication.shared.openURL(url)
  }
}

New Way

Objective C

#import <StoreKit/StoreKit.h>

+(void) displayReviewController {
    if (@available(iOS 10.3, *)) {
        [SKStoreReviewController requestReview];
    }
}

In Swift

func requestReview() {
   if #available(iOS 10.3, *) {
       SKStoreReviewController.requestReview()
   } else {
      // Fallback on earlier versions
      // Try any other 3rd party or manual method here.
  }
}

When to Show?

1. Ask for a rating only after the user has demonstrated engagement with your app.
2. Don’t interrupt the user, especially when they’re performing a time-sensitive or stressful task

Note

1. The OS will prevent more than 3 times in 365 times.
2. When the app is in development, the review will show up, but you won’t be able to review the app.
3. The app in the TestFlight has the same behaviour as the app in the Development.

How to use Theme in a Flutter App?

$
0
0

In this article, I will tell you a simple way to theme a flutter app.

Here is a simple code that illustrates that.
We use the theme property of each widget to theme it.

For example, to theme the whole application, we would do something like this.

import 'package:flutter/material.dart';
import 'Pages/theme_demo.dart';

void main() => runApp(new MyApp());

class MyApp extends StatelessWidget {
  @override
  Widget build(BuildContext context) {
    return MaterialApp(
      title: "Test App",
      home: new ThemeDemo(),
      theme: ThemeData(
          primarySwatch: Colors.green,
          brightness: Brightness.light,
          accentColor: Colors.red),
    );
  }
}

Take a look at the theme property of the MaterialApp.
You can customize it the way you want.

and the theme_demo.dart will look simpley like this

import 'package:flutter/material.dart';

class ThemeDemo extends StatefulWidget {
  @override
  State<StatefulWidget> createState() {
    return _ThemeDemoState();
  }
}

class _ThemeDemoState extends State<ThemeDemo> {
  @override
  Widget build(BuildContext context) {
    return Center(
      child: Container(
        child: Column(
          mainAxisAlignment: MainAxisAlignment.spaceEvenly,
          children: <Widget>[
            Text("Hello Flutter"),
            RaisedButton(
              child: Text("Click"),
              onPressed: () => {},
            )
          ],
        ),
      ),
    );
  }
}

Interview Question – 12 – Bon Appétit

$
0
0

Question

You can download the problem statement from here.

Solution

 static void bonAppetit(List<Integer> bill, int k, int charged) {
	    	
    int actualBill = 0;
    int payBill = 0;
    int size = bill.size();
    for(int i = 0; i < size; i++) {
        actualBill += bill.get(i);
    }
        
    payBill = actualBill - bill.get(k);
    payBill = payBill/2;
    
    print("Actual Bill : " + payBill);
    if(payBill == charged) {
        System.out.println("Bon Appetit");
    }else {
        System.out.println(Math.abs(charged - payBill));
    }

}

Using WKWebkit in iOS – Simple Example

$
0
0

Whenever you want to show a webpage in your iOS App, use WKWebview instead of UIWebview. You have to supply an url that is complete. ie. with “http” or “https”. If you are using “http”, make sure you enable the “App Transport Security Settings” and add “Allow Arbitrary Loads” to yes.


Our Final output will look like this.

Init Webview

  func loadPage() {
        let url = URL(string: "http://coderzheaven.com")!
        self.webView.load(URLRequest(url: url))
        self.webView.allowsBackForwardNavigationGestures = true
  }

Listen to Navigation Events

We will have to add the Delegate class WKNavigationDelegate and implement it’s methods.

class ViewController: UIViewController, WKNavigationDelegate 

Implement the WKNavigationDelegate methods

First we will register for some events in the viewDidLoad like this

 func setWebviewObservers() -> Void {
    webView.navigationDelegate = self;
    let webViewKeyPathsToObserve = ["loading", "estimatedProgress"]
    for keyPath in webViewKeyPathsToObserve {
        webView.addObserver(self, forKeyPath: keyPath, options: .new, context: nil)
    }
}

call setWebviewObservers() in the viewDidLoad method.

Now we will implement the methods for us to listen to the webview events.

func webView(_ webView: WKWebView, didFinish navigation: WKNavigation!) {
    print("finished")
}

func webView(_ webView: WKWebView, didStartProvisionalNavigation navigation: WKNavigation!) {
    print("Navigation Started...");
}

func webView(_ webView: WKWebView, decidePolicyFor navigationAction: WKNavigationAction, decisionHandler: @escaping (WKNavigationActionPolicy) -> Void) {
    decisionHandler(.allow)
}

override func observeValue(forKeyPath keyPath: String?, of object: Any?, change: [NSKeyValueChangeKey : Any]?, context: UnsafeMutableRawPointer?) {
    guard let keyPath = keyPath else { return }
    switch keyPath {
        case "loading":
            print("loading")
            self.btnBack.isEnabled = webView.canGoBack
            self.btnFwd.isEnabled = webView.canGoForward
        case "estimatedProgress":
            let p = Int(webView.estimatedProgress * 100)
            if 100 == p {
                // Loading Complete
            }else{
               // Still Loading...
            }
            break;
        default:
            break
    }
}

Go Forward and Backward

Here I have two button for forward and backward navigation in your webView app.

webView.canGoForward will be true if the browser can move to the next page, similar to a web browser. webView.canGoBack will be true if the browser can move to the previous page, similar to a web browser.

@IBAction func btnTapFwd(_ sender: Any) {
    if webView.canGoForward {
        webView.goForward()
    }
}

@IBAction func btnTapBck(_ sender: Any) {
    if webView.canGoBack {
        webView.goBack()
    }
}

Thanks. Let me know if you have any comments.

What is Context in Android and What is the proper way to use it?

$
0
0

Lets see what a Context is…

  • Context : Current State of the application.
  • Context : Handle of the application.
  • Context : Provides access to the resources, preferences, accessing database etc.

Activity inherits from the Context.

Context is the most important part of the Android application and its everywhere.

If you wrongly use Context, it can lead to memory leaks.

Different types of Context

  • Application Context – getApplicationContext()
  • Activity Context – Context of the Activity.
  • getContext()

Application Context

  • It is Singleton.
  • Accessed via getApplicationContext()
  • Can be used anywhere where you need context separate from the current context.

Example : File access or if you have a singleton class of you own, always pass the getApplicationContext() to get resources inside that class.

What you are doing wrong?

If you pass Activity context, then it will keep reference to the Activity and will lead to memory leaks since the Activity will not be garbage colleted.

When to use getApplicationContext()?

Use getApplicationContext() when you need a context that needs to live longer than the current context(eg: Activity context).

Activity Context

When to use ?

When you want to access resources specific to a current Activity.

Example : If you are creating an object inside an Activity, use Activity Context.

TextView tv = new TextView(this); // Here 'this' is the Activity Context

getContext() in ContentProvider

This context is the application context and can be used similar to the application context. This can be accessed via getContext() method.

What are developer should remember?

  • Use getApplicationContext() only when you are accessing resources that are not tied to an Activity.
  • Use Activity Context only when the resources you access wont extend beyond the Activity lifecycle.

These are one of the basics of Android Development. Learn good and write good code.


Vivo Nex Dual Display – The Dual Display Smartphone

Is Javascript Multithreaded? How it handles asynchronous actions?

$
0
0

Javascript is a single threaded application. That means you cannot run more than one script at one time to modify DOM or something.

But there are something called “Worker Threads” that spans separate threads outside your application that can do complex tasks which is linked by a Callback method.

What is a Web Worker?

When executing scripts in an HTML page, the page becomes unresponsive until the script is finished.

A web worker is a JavaScript that runs in the background, independently of other scripts, without affecting the performance of the page. You can continue to do whatever you want: clicking, selecting things, etc., while the web worker runs in the background.

You can read more about Worker Thread from here.

Example

<script>
var w;

function startWorker() {
  if (typeof(Worker) !== "undefined") {
    if (typeof(w) == "undefined") {
      w = new Worker("demo_workers.js");
    }
    w.onmessage = function(event) {
      document.getElementById("result").innerHTML = event.data;
    };
  } else {
    document.getElementById("result").innerHTML = "Sorry! No Web Worker support.";
  }
}

function stopWorker() { 
  w.terminate(); //terminate a webworker
  w = undefined; 
}
</script>

Another Example

    var myWorker = new Worker('my_task.js');

    myWorker.onmessage = function(oEvent) {
    console.log('Worker said : ' + oEvent.data);
    };

    myWorker.postMessage('ali');

And the my_task.js will look like this

postMessage("I\'m working before postMessage(\'ali\').");

onmessage = function(oEvent) {
  postMessage('Hi ' + oEvent.data);
};

Your ‘demo_workers.js’ may be doing some heavy work, but that will be handled by the WorkerThread.

Reuse the Web Worker

If you set the worker variable to undefined, after it has been terminated, you can reuse the code:

w = undefined;

This is the same mechanism that is used in Single Page applications like React-Native Vue.js etc…

Post Message to the worker

To post your own message to the worker, you can use worker.postMessage([JavaScript-Object])

It will be received inside worker.onmessage() like this.

worker.onmessage(function(e)){
  if(e.yourMessage){
  }
}

The Webworker has no access to the DOM.
But it has access to so many other things such asp

1. Geolocation
2. user agent
3. Cookie enabled
4. host
5. pathname
6. href
7. Application Cache.
8. TimeOuts…(setTimeOut)
8. XMLHttpRequest and many more…

Note: You can create other worker threads from a Worker thread as well.
You can also import other scripts as well.

For Example

importScripts();                         /* imports nothing */
importScripts('foo.js');                 /* imports just "foo.js" */
importScripts('foo.js', 'bar.js');       /* imports two scripts */
importScripts('//example.com/hello.js'); /* You can import scripts from other origins */

Thanks for reading. Please leave your valuable comments below.

Load data from internet to a GridView in Flutter with Retry Logic, JSON parsing and Error handling in Flutter

$
0
0

I am assuming that you already have some understanding about Flutter.
If you have no information about Flutter SDK, then I could recommend first going to flutter.io and get the initial knowledge.

Our Final app will look like this.

App will implement

  • GridView
  • JSON Implementation
  • Error Handling
  • Retry Implementation

At first we will create the cell for the GridView in our App.

Don’t be scared about the long set of code, most of them are just for styling purposes, since all views in Flutter are Widgets, even for applying padding, we have to add Padding Widget.
So be cool and start…

Go ahead and create a dart file named cell_model.dart

Cell Model

we are using this sample service from the web to get the data.
[https://jsonplaceholder.typicode.com/photos].

This is the sample output from the above url.

[
  {
    "albumId": 1,
    "id": 1,
    "title": "accusamus beatae ad facilis cum similique qui sunt",
    "url": "https://via.placeholder.com/600/92c952",
    "thumbnailUrl": "https://via.placeholder.com/150/92c952"
  },
  {
    "albumId": 1,
    "id": 2,
    "title": "reprehenderit est deserunt velit ipsam",
    "url": "https://via.placeholder.com/600/771796",
    "thumbnailUrl": "https://via.placeholder.com/150/771796"
  }
]

We will be mapping the above output to the below model and apply it to the GridView.

class CellModel {
  int albumId;
  int id;
  String title;
  String url;
  String thumbnailUrl;

  CellModel({this.albumId, this.id, this.title, this.url, this.thumbnailUrl});

  factory CellModel.fromJson(Map<String, dynamic> json) {
    return CellModel(
        albumId: json['albumId'] as int,
        id: json['id'] as int,
        title: json['title'] as String,
        url: json['url'] as String,
        thumbnailUrl: json['thumbnailUrl'] as String);
  }
}

Cell For the GridView

Now Let’s create the view for each cell in the GridView.
Create a new dart file named “cell.dart” and copy the below contents to it.

We have a Text and an Image in each cell of the GridView.


import 'package:flutter/material.dart';
import 'cell_model.dart';

class Cell extends StatelessWidget {
  const Cell(this.cellModel);
  @required
  final CellModel cellModel;

  @override
  Widget build(BuildContext context) {
    return Center(
      child: Container(
        child: Padding(
          padding:
              new EdgeInsets.only(left: 0.0, right: 0.0, bottom: 0.0, top: 0.0),
          child: Column(
            crossAxisAlignment: CrossAxisAlignment.center,
            children: <Widget>[
              Image.network(cellModel.thumbnailUrl,
                  width: 150.0,
                  height: 150.0,
                  alignment: Alignment.center,
                  fit: BoxFit.fill),
              Padding(
                padding: EdgeInsets.all(10.0),
                child: Text(
                  cellModel.title,
                  textAlign: TextAlign.center,
                  overflow: TextOverflow.ellipsis,
                  style: TextStyle(fontWeight: FontWeight.w500),
                ),
              ),
            ],
          ),
        ),
      ),
    );
  }
}

Ok. Now we have the cell’s model and the View for the GridView Cell.

Now Lets create the service call

Service call

To make service calls we have to add a package to flutter.
For that, open pubspec.yaml which is present in the root of your project.

dependencies:
  flutter:
    sdk: flutter

  http: "0.11.3+17"

Now we will write the service call. Let’s create a new dart file named “services.dart” and copy the below content to it.

import 'dart:async';
import 'dart:convert';
import 'package:http/http.dart' as http;
import 'cell_model.dart';
import 'constants.dart';

class Services {
  static Future<List<CellModel>> fetchHomeData() async {
    final response = await http.get(APPURLS.SAMPLE_URL);
    try {
      if (response.statusCode == 200) {
        List<CellModel> list = parsePostsForHome(response.body);
        return list;
      } else {
        throw Exception(MESSAGES.INTERNET_ERROR);
      }
    } catch (e) {
      throw Exception(MESSAGES.INTERNET_ERROR);
    }
  }

  static List<CellModel> parsePostsForHome(String responseBody) {
    final parsed = json.decode(responseBody).cast<Map<String, dynamic>>();
    return parsed.map<CellModel>((json) => CellModel.fromJson(json)).toList();
  }
}

Don’t worry about the errors now, we will be fixing it soon.

We have a constants file where we define the constants. Let create another file named “constants.dart”.

Constants

import 'package:flutter/material.dart';

class APPURLS {
  static const String SAMPLE_URL =
      "https://jsonplaceholder.typicode.com/photos";
}

class MESSAGES {
  static const String INTERNET_ERROR = "No Internet Connection";
  static const String INTERNET_ERROR_RETRY =
      "No Internet Connection.\nPlease Retry";
}

class COLORS {
  // App Colors //
  static const Color DRAWER_BG_COLOR = Colors.lightGreen;
  static const Color APP_THEME_COLOR = Colors.green;
}

OK now, we have all the prerequisites.

We will create one more dart file for the Common components we will use in the application, such as AppBar, Retry Button, Progress-bar and the GridView.

Create a new file named “common_comp.dart”

Common components

import 'package:flutter/material.dart';
import 'constants.dart';
import 'cell.dart';
import 'cell_model.dart';

class ComComp {
  static Padding text(String text, FontWeight fontWeight, double fontSize,
      List padding, Color color, TextOverflow overflow) {
    return Padding(
      padding: new EdgeInsets.only(
          left: padding[0],
          right: padding[1],
          top: padding[2],
          bottom: padding[3]),
      child: Text(
        text,
        textAlign: TextAlign.left,
        overflow: overflow,
        style: TextStyle(
          fontWeight: fontWeight,
          fontSize: fontSize,
          color: color,
        ),
      ),
    );
  }

  static AppBar getAppBar(Color color, String title) {
    return AppBar(
      backgroundColor: COLORS.APP_THEME_COLOR,
      title: Center(
        child: new Text(title.toUpperCase()),
      ),
      actions: <Widget>[],
    );
  }

  static CircularProgressIndicator circularProgress() {
    return CircularProgressIndicator(
      valueColor: new AlwaysStoppedAnimation<Color>(COLORS.APP_THEME_COLOR),
    );
  }

  static GestureDetector internetErrorText(Function callback) {
    return GestureDetector(
      onTap: callback,
      child: Center(
        child: Text(MESSAGES.INTERNET_ERROR),
      ),
    );
  }

  static Padding homeGrid(
      AsyncSnapshot<List<CellModel>> snapshot, Function gridClicked) {
    return Padding(
      padding:
          EdgeInsets.only(left: 20.0, right: 20.0, bottom: 20.0, top: 30.0),
      child: GridView.builder(
        shrinkWrap: true,
        itemCount: snapshot.data.length,
        gridDelegate:
            SliverGridDelegateWithFixedCrossAxisCount(crossAxisCount: 2),
        itemBuilder: (BuildContext context, int index) {
          return GestureDetector(
            child: Cell(snapshot.data[index]),
            onTap: () => gridClicked(context, snapshot.data[index]),
          );
        },
      ),
    );
  }

  static FlatButton retryButton(Function fetch) {
    return FlatButton(
      child: Text(
        MESSAGES.INTERNET_ERROR_RETRY,
        textAlign: TextAlign.center,
        overflow: TextOverflow.ellipsis,
        style: TextStyle(fontWeight: FontWeight.normal),
      ),
      onPressed: () => fetch(),
    );
  }
}

HomeScreen with GridView

Here is the complete screen that implements the GridView and the Retry Logic.

Launch this Widget from the main.dart

import 'package:flutter/material.dart';
import 'cell_model.dart';
import 'common_comp.dart';
import 'constants.dart';
import 'services.dart';

class MyHomePage extends StatefulWidget {
  MyHomePage({Key key}) : super(key: key);

  @override
  _MyHomePageState createState() => new _MyHomePageState();
}

class _MyHomePageState extends State<MyHomePage> {
  bool isHomeDataLoading;

  @override
  void initState() {
    super.initState();
    isHomeDataLoading = false;
  }

  @override
  Widget build(BuildContext context) {
    return new Scaffold(
      backgroundColor: Colors.white,
      appBar: ComComp.getAppBar(COLORS.APP_THEME_COLOR, "Home"),
      body: Center(
        child: Container(
          child: FutureBuilder<List<CellModel>>(
            future: Services.fetchHomeData(),
            builder: (context, snapshot) {
              return snapshot.connectionState == ConnectionState.done
                  ? snapshot.hasData
                      ? ComComp.homeGrid(snapshot, gridClicked)
                      : ComComp.retryButton(fetch)
                  : ComComp.circularProgress();
            },
          ),
        ),
      ),
    );
  }

  setLoading(bool loading) {
    setState(() {
      isHomeDataLoading = loading;
    });
  }

  fetch() {
    setLoading(true);
  }
}

gridClicked(BuildContext context, CellModel cellModel) {
  // Grid Click
}

Main Widget

Finally launch our Home Page from the main.dart file.

import 'package:flutter/material.dart';
import 'home_page.dart';

void main() => runApp(new MyApp());

class MyApp extends StatelessWidget {
  @override
  Widget build(BuildContext context) {
    return new MaterialApp(
      title: 'Demo App',
      theme: new ThemeData(
        primarySwatch: Colors.blue,
      ),
      home: new MyHomePage(),
    );
  }
}

And that’s it. Leave your valuable comments below.

Service Call in Flutter with Retry Button, Catch Network failures.

$
0
0

Hello Devs,

In today’s tutorial we will find out how we can write a simple service call in flutter and show retry when network call fails.

Below is a sample video of the app we are going to make…

Watch Video Tutorial

You can watch the complete video tutorial from here…

Add Library

To do service calls in Flutter, you need to add ‘http’ library. For that open ‘pubspec.yaml‘ which is preset in the root of your folder.

Now you have to add the library from this here.

So our ‘pubspec.yaml‘ file should look like this.

name: flutter_demo1
description: A new Flutter project.

version: 1.0.0+1

environment:
  sdk: ">=2.0.0-dev.68.0 <3.0.0"

dependencies:
  flutter:
    sdk: flutter

  cupertino_icons: ^0.1.2
  http: "0.11.3+17"

dev_dependencies:
  flutter_test:
    sdk: flutter

Service Call

I am using the below sample fake json url for getting the data.

https://jsonplaceholder.typicode.com/todos/1

Here is the sample output

{
  "userId": 1,
  "id": 1,
  "title": "delectus aut autem",
  "completed": false
}

Our Service call function will look like this.

void callService() async {
    try {
      final response =
          await http.get("https://jsonplaceholder.typicode.com/todos/1");
      if (response.statusCode == 200) {
        print(response.body);
        final parsed = json.decode(response.body);
        print(parsed["id"]);
      } else {
        print("Error");
      }
    } catch (e) {
    }
  }

Complete Example

We have a text and a button in the UI. The button will invoke the above service call and we will show the results in the Text Widget.

We will show a CircularProgressBar when the service is loading and hides when complete. If the service fails, we will show the error in the Text Widget.

Our complete program will look like this.

import 'package:flutter/material.dart';
import 'dart:convert';
import 'package:http/http.dart' as http;

void main() => runApp(MyApp());

class MyApp extends StatelessWidget {
  // This widget is the root of your application.
  @override
  Widget build(BuildContext context) {
    return MaterialApp(
      title: 'Flutter Demo',
      theme: ThemeData(
        primarySwatch: Colors.blue,
      ),
      home: MyHomePage(title: 'Flutter Demo Home Page'),
    );
  }
}

class MyHomePage extends StatefulWidget {
  MyHomePage({Key key, this.title}) : super(key: key);

  final String title;

  @override
  _MyHomePageState createState() => _MyHomePageState();
}

class _MyHomePageState extends State<MyHomePage> {
  String title = 'No Data';
  bool isLoading = false;

  void callService() async {
    setState(() {
      isLoading = true;
    });
    print("Calling Service...");

    try {
      final response =
          await http.get("https://jsonplaceholder.typicode.com/todos/1");
      if (response.statusCode == 200) {
        print(response.body);
        final parsed = json.decode(response.body);
        print(parsed["id"]);
        print(parsed["title"]);
        setState(() {
          title = parsed["title"];
        });
      } else {
        print("Error");
        setState(() {
          title = "Error Occurred";
        });
      }
    } catch (e) {
      setState(() {
        title = e.toString();
      });
    }

    setState(() {
      isLoading = false;
    });
  }

  @override
  Widget build(BuildContext context) {
    return Scaffold(
      appBar: AppBar(
        title: Text(widget.title),
      ),
      body: Center(
        child: Column(
          mainAxisAlignment: MainAxisAlignment.center,
          children: <Widget>[
            isLoading
                ? CircularProgressIndicator()
                : Text(
                    title,
                  ),
            RaisedButton(
              child: Text("Call Service"),
              onPressed: callService,
            )
          ],
        ),
      ),
    );
  }
}

Navigation and Passing params between Screens in Flutter

$
0
0

Hello devs…

This is a simple tutorial in which we will see how to navigate between two screens in flutter and pass params from one screen to another screen.

We have two screens, the first screen is named “screen1.dart” which would look like this.

Watch Tutorial

You can see the video tutorial here…

Screen 1

import 'package:flutter/material.dart';
import 'screen2.dart';

class ScreenOne extends StatefulWidget {
  ScreenOne() : super();

  final String title = "Screen One";

  @override
  _ScreenOneState createState() => _ScreenOneState();
}

class _ScreenOneState extends State<ScreenOne> {
  void goToNextPage(BuildContext context) {
    Navigator.push(
        context,
        new MaterialPageRoute(
            builder: (BuildContext context) => new ScreenTwo("Screen Two")));
  }

  @override
  Widget build(BuildContext context) {
    return Scaffold(
      appBar: AppBar(
        title: Text(widget.title),
      ),
      body: Center(
        child: Column(
          mainAxisAlignment: MainAxisAlignment.center,
          children: <Widget>[
            Text(
              "Screen One",
            ),
            RaisedButton(
              child: Text("Go to Next Page"),
              onPressed: () {
                goToNextPage(context);
              },
            )
          ],
        ),
      ),
    );
  }
}

We have one button in this screen. The press of the button will navigate you to next screen.

To Navigate, we use the inbuilt navigator.
Below is the code that does the trick.

  Navigator.push(
        context,
        new MaterialPageRoute(
            builder: (BuildContext context) => new ScreenTwo("Screen Two")));

Screen 2

Now the next screen, that has a button that closes the screen and it will accept a parameter named”title” in the form of a String.

Our screen2.dart will look like this.

import 'package:flutter/material.dart';

class ScreenTwo extends StatefulWidget {
  ScreenTwo(this.title) : super();

  final String title;

  @override
  _ScreenTwoState createState() => _ScreenTwoState();
}

class _ScreenTwoState extends State<ScreenTwo> {
  void goBack(BuildContext context) {
    Navigator.pop(context);
  }

  @override
  Widget build(BuildContext context) {
    return Scaffold(
      appBar: AppBar(
        title: Text(widget.title),
      ),
      body: Center(
        child: Column(
          mainAxisAlignment: MainAxisAlignment.center,
          children: <Widget>[
            Text(
              widget.title,
            ),
            RaisedButton(
              child: Text("Go Back"),
              onPressed: () {
                goBack(context);
              },
            )
          ],
        ),
      ),
    );
  }
}

It’s that simple.

How to listen to onChange of a TextField in Flutter?

$
0
0

TextField is a common component in our applications.

In this simple example we will see two ways you can listen to the text changes in a Flutter TextField.

Watch Video Tutorial

1. Using OnChange Event

This one is simple. Just supply the onChange event of the TextField with a onChange callback.

Example

TextField(
   onChanged: (text) {
      print("text $text");
   },
)

2. Using TextEditingController

This is also very simple. Here you have to declare a controller of instance TextEditingController.

final myController = TextEditingController();

// add Listener in InitState()

@override
void initState() {
   super.initState();
   // Start listening to changes
   myController.addListener(textListener);
}

// Use the controller in TextField

TextField(
    controller: myController,
)

Complete Example

import 'package:flutter/material.dart';

class TFChange extends StatefulWidget {

  final String title = "TextField Demo";

  @override
  _TFChangeChange createState() => _TFChangeChange();

}

class _TFChangeChange extends State<TFChange> {

  final myController = TextEditingController();

  textListener() {
    print("Current Text is ${myController.text}");
  }

  @override
  void dispose() {
    super.dispose();
    myController.dispose();
  }

  @override
  void initState() {
    super.initState();
    myController.addListener(textListener);
  }

  @override
  Widget build(BuildContext context) {
    return Scaffold(
      appBar: AppBar(
        title: Text(widget.title),
      ),
      body: Center(
        child: Column(
          mainAxisAlignment: MainAxisAlignment.center,
          children: <Widget>[
            TextField(
              onChanged: (text) {
                print("Text $text");
              },
            ),
            TextField(
              controller: myController,
            )
          ],
        ),
      ),
    );
  }

}

Flutter – Android, iOS , Native communication Simple Demo

$
0
0

Hello Devs,

You know flutter is now a hot topic. Learning flutter will always help in your future career.

In this article we will see how we can communicate between Flutter and Android.

Watch Video Tutorial

MethodChannel

Flutter communicate with Native using “MethodChannel“. So you have to create a method channel with a constant as identifier. Make sure you give the same constant name both on Native side(Android or iOS) and Flutter side as well…Here it is “MyNativeChannel”.

static const platform = const MethodChannel('MyNativeChannel');

Communication with native is always asynchronous, so the return type will always be of type “Future<>“. This is important to understand.

Below is a simple function that communicates with the Native side.

Future<void> getData() async {
    String message;
    try {
        message = await platform.invokeMethod('getData');
        print(message);
    } on PlatformException catch (e) {
        message = "Failed to get data from native : '${e.message}'.";
    }
    setState(() {
        msg = message;
    });
}

The method should be async with the await callback.
await platform.invokeMethod(‘getData’) will send the method name “getData” to the native side and on the native side we can check what is the method name and execute that method.

Android Native side

We are trying to call a method that is defined in the Android native side and we know that the method name is “getData()”.

Open the MainActivity inside the android/src/your_package folder and create a method named “getData()”. Our method simply returns a String and looks like this.

private String getData() {
    return "Message From Android";
}

Receive the event from Flutter Side

we have to define something on the Android side so that we can receive the call from Flutter side.

In your MainActivity

 private static final String CHANNEL = "MyNativeChannel";

 new MethodChannel(getFlutterView(), CHANNEL).setMethodCallHandler(
                new MethodChannel.MethodCallHandler() {
                    @Override
                    public void onMethodCall(MethodCall call, MethodChannel.Result result) {
                        if (call.method.equals("getData")) {
                            result.success(getData());
                        } else {
                            result.notImplemented();
                        }
                    }
                });

When you call “getData()” function in Flutter that invokes the “MethodCallHandler” in the Android side and we will receive the function name with params from the Flutter side.

Complete MainActivity

The complete MainActivity would look like this.

package com.example.flutterdemo1;

import android.os.Bundle;

import io.flutter.app.FlutterActivity;
import io.flutter.plugin.common.MethodCall;
import io.flutter.plugin.common.MethodChannel;
import io.flutter.plugins.GeneratedPluginRegistrant;

public class MainActivity extends FlutterActivity {

    private static final String CHANNEL = "MyNativeChannel";

    @Override
    protected void onCreate(Bundle savedInstanceState) {
        super.onCreate(savedInstanceState);
        GeneratedPluginRegistrant.registerWith(this);

        new MethodChannel(getFlutterView(), CHANNEL).setMethodCallHandler(
                new MethodChannel.MethodCallHandler() {
                    @Override
                    public void onMethodCall(MethodCall call, MethodChannel.Result result) {
                        if (call.method.equals("getData")) {
                            result.success(getData());
                        } else {
                            result.notImplemented();
                        }
                    }
                });
    }

    private String getData() {
        return "Message From Android";
    }
}

iOS Native Side

Go to AppDelegate.m file and replace the contents with this

#include "AppDelegate.h"
#include "GeneratedPluginRegistrant.h"

@implementation AppDelegate

- (BOOL)application:(UIApplication *)application
    didFinishLaunchingWithOptions:(NSDictionary *)launchOptions {
    
    FlutterViewController *controller = (FlutterViewController *) self.window.rootViewController;
    FlutterMethodChannel *channel = [FlutterMethodChannel methodChannelWithName:@"MyChannel" binaryMessenger:controller];
    
    [channel setMethodCallHandler:^(FlutterMethodCall* call, FlutterResult result) {
        NSString *from = call.arguments[@"from"];
        if([@"myNativeFunction" isEqualToString:call.method]){
            NSString *messageToFlutter = [self myNativeFunction];
            messageToFlutter = [NSString stringWithFormat:@"%@, Back to %@", messageToFlutter, from];
            result(messageToFlutter);
        }
    }];
  [GeneratedPluginRegistrant registerWithRegistry:self];
  // Override point for customization after application launch.
  return [super application:application didFinishLaunchingWithOptions:launchOptions];
}

-(NSString *) myNativeFunction{
    return @"Message from iOS";
}

@end

Note: Once you change the native side, you have restart the complete app to take effect.

Complete Flutter Code

The complete flutter code will look like this…
Our UI has a Text and a button that will invoke the getData function in the Android side.
When we get the result back from the Android side, we will show it in the Text in the Flutter side.

import 'package:flutter/material.dart';
import 'package:flutter/services.dart';

class NativeDemoScreen extends StatefulWidget {
  @override
  _NativeDemoScreenState createState() => _NativeDemoScreenState();
}

class _NativeDemoScreenState extends State<NativeDemoScreen> {
  static const platform = const MethodChannel('MyNativeChannel');
  String msg = "No Message";

  Future<void> getData() async {
    String message;
    try {
      message = await platform.invokeMethod('getData');
      print(message);
    } on PlatformException catch (e) {
      message = "Failed to get data from native : '${e.message}'.";
    }
    setState(() {
      msg = message;
    });
  }

  @override
  Widget build(BuildContext context) {
    return Scaffold(
      appBar: AppBar(
        title: Text("Native Demo"),
      ),
      body: Center(
        child: Column(
          mainAxisAlignment: MainAxisAlignment.center,
          children: <Widget>[
            Text(
              msg,
            ),
            RaisedButton(
              child: Text("Call Native Function"),
              onPressed: getData,
            )
          ],
        ),
      ),
    );
  }
}

Sending Params to Native

To Send params to the native side, you can modify the above flutter function like this.

Flutter Side

Future<void> getData() async {
    var params = <String, dynamic>{"from": "Flutter"};
    String message;
    try {
        message = await platform.invokeMethod('getData', params);
        print(message);
    } on PlatformException catch (e) {
        message = "Failed to get data from native : '${e.message}'.";
    }
    setState(() {
        msg = message;
    });
}

Android Side

Map<String, Object> params = (Map<String, Object>) call.arguments;
if (call.method.equals("getData")) {
    result.success(getData() + " Back to " + params.get("from"));
} else {
    result.notImplemented();
}

It’s that simple. Let me know your feedback in the comments section below.

Thanks for reading.


File Operations in Flutter – Read and Write Files – Easiest Example

$
0
0

In Today’s tutorial, we will see how to handle files in Flutter.

Its so easy…

So Let’s start…

Below is the sample app we are going to create…


Watch Video Tutorial


Add Dependencies

For handling files in Flutter, we have to add a flutter dependency.
Go to the below link and read more about the dependency.
https://pub.dartlang.org/packages/path_provider#-readme-tab-

File Utility Class

For convenience let’s create a utility class for file operations. Create a new dart file named file_utils.dart. Our utility class is going to look like this. Here we are going to write to a file named “myfile.txt”.

Below are our utility functions for file operations.

  • getFilePath :- Get the application’d Document’s directory.
  • getFile :- Get the file descriptor from the Directory.
  • saveToFile :- Save the data to the file.
  • readFromFile :- Read the contents from the file.
import 'package:path_provider/path_provider.dart';
import 'dart:io';

class FileUtils {
  static Future<String> get getFilePath async {
    final directory = await getApplicationDocumentsDirectory();
    return directory.path;
  }

  static Future<File> get getFile async {
    final path = await getFilePath;
    return File('$path/myfile.txt');
  }

  static Future<File> saveToFile(String data) async {
    final file = await getFile;
    return file.writeAsString(data);
  }

  static Future<String> readFromFile() async {
    try {
      final file = await getFile;
      String fileContents = await file.readAsString();
      return fileContents;
    } catch (e) {
      return "";
    }
  }
}

Now we are going to use this utility functions in our UI.

Our UI has a TextField, a button with onPress to save the data, Another button to read the data from the file and a label to show the contents of file.

UI

Here is the dart file which contains the UI.

import 'package:flutter/material.dart';
import 'file_utils.dart';

class FileOperationsScreen extends readAsString {
  FileOperationsScreen() : super();

  final String title = "File Operations";

  @override
  _FileOperationsScreenState createState() => _FileOperationsScreenState();
}

class _FileOperationsScreenState extends State<FileOperationsScreen> {
  String fileContents = "No Data";
  final myController = TextEditingController();

  @override
  Widget build(BuildContext context) {
    return Scaffold(
      appBar: AppBar(
        title: Text(widget.title),
      ),
      body: Column(
        mainAxisAlignment: MainAxisAlignment.start,
        children: <Widget>[
          TextField(
            controller: myController,
          ),
          RaisedButton(
            child: Text("Save To File"),
            onPressed: () {
              FileUtils.saveToFile(myController.text);
            },
          ),
          RaisedButton(
            child: Text("Read From File"),
            onPressed: () {
              FileUtils.readFromFile().then((contents) {
                setState(() {
                  fileContents = contents;
                });
              });
            },
          ),
          Text(fileContents),
        ],
      ),
    );
  }
}

And That’s it. Leave your valuable comments below.
Thanks.

Switch Widget in Flutter Android and iOS Demo

$
0
0

Hello…

In this article I am gonna show you how to implement a switch widget in Flutter.

Watch Video Tutorial

The switch widget has the following syntax.

 Switch(value: val, onChanged: (newVal) { print (newVal(); })

OnChange function is called when the user toggles the button.

We have to create a state variable in the parent Widget to hold the state of the switch widget and change the state variable when the user toggles the switch button.

Lets jump to the simple complete example…

Complete Example

import 'package:flutter/material.dart';

class SwitchDemoScreen extends StatefulWidget {
  SwitchDemoScreen() : super();

  final String title = "Switch App";

  @override
  _SwitchDemoScreenState createState() => _SwitchDemoScreenState();
}

class _SwitchDemoScreenState extends State<SwitchDemoScreen> {
  bool val = false;

  onSwitchValueChanged(bool newVal) {
    setState(() {
      val = newVal;
    });
  }

  @override
  Widget build(BuildContext context) {
    return Scaffold(
      appBar: AppBar(
        title: Text(widget.title),
      ),
      body: Center(
        child: Column(
          mainAxisAlignment: MainAxisAlignment.center,
          children: <Widget>[
            Text(
              "Flutter Switch Demo",
            ),
            Switch(
                value: val,
                onChanged: (newVal) {
                  onSwitchValueChanged(newVal);
                })
          ],
        ),
      ),
    );
  }
}

Source Code

You can download the complete source code from here.

Thanks for reading my article. Please leave your comments below.

Create Custom Widget(Button) in Flutter – Android or iOS

$
0
0

Hello friends,

In this article, I will show you how you can create custom widgets in Flutter using Widget Composition. As you know Flutter is cross Platform, so this is gonna work for both Android and iOS.

Watch Video Tutorial


Let’s start now.
 
I am going to create a custom button just like you see in the below image.
 

Custom Button in Flutter

Custom Button in Flutter


First thing to do is to create a new dart file named “custom_button.dart” inside you ‘lib‘ folder or any folder inside ‘lib‘.

 
My Folder structure is like this


Folder Structure

Folder Structure

Now we will create the custom class inside the ‘custom_button.dart‘.

Our Custom Button has one parameter in the constructor which is a onPressed function that is going to be called when user taps on the button.


CustomButton({@required this.onPressed});

final GestureTapCallback onPressed;


Then we will add a ‘Row’ Widget with widgets ‘Text’ and ‘Icon’ as Children. We will add ‘SizeBox’ in between the ‘Text’ and ‘Icon’ to add some space.

 
The Text Widget will look like this.


Text(
    "Tap Me",
    maxLines: 1,
    style: TextStyle(color: Colors.white),
)

 
As you see, you can style the ‘Text‘ with the ‘style‘ property.

 
Custom Button – Complete Code

 
The whole custom button Code will look like this.


import 'package:flutter/foundation.dart';
import 'package:flutter/material.dart';

class CustomButton extends StatelessWidget {
  CustomButton({@required this.onPressed});
  final GestureTapCallback onPressed;

  @override
  Widget build(BuildContext context) {
    return RawMaterialButton(
      fillColor: Colors.green,
      splashColor: Colors.greenAccent,
      child: Padding(
        padding: EdgeInsets.all(10.0),
        child: Row(
          mainAxisSize: MainAxisSize.min,
          children: const <Widget>[
            Icon(
              Icons.face,
              color: Colors.amber,
            ),
            SizedBox(
              width: 10.0,
            ),
            Text(
              "Tap Me",
              maxLines: 1,
              style: TextStyle(color: Colors.white),
            ),
          ],
        ),
      ),
      onPressed: onPressed,
      shape: const StadiumBorder(),
    );
  }
}

 
StadiumBorder()‘ to give the curved effect for the button.
Padding‘ widget is added to give padding for the whole widget. Padding Widget will accept only one child. RawMaterialButton is the parent component that comes from material library in Flutter. GestureTapCallback handles the tap on the button.

 
Our Custom Button is done.

 
Use it

 
In the parent widget component, import the custom_button.dart and add as like a normal widget. Don’t forget to give the ‘onPressed’ property as it is a required one.


class _CustomWidgetDemoState extends State<CustomWidgetDemo> {
  @override
  Widget build(BuildContext context) {
    return Scaffold(
      appBar: AppBar(
        title: Text(widget.title),
      ),
      body: Center(
        child: Column(
          mainAxisAlignment: MainAxisAlignment.spaceEvenly,
          children: <Widget>[
            Text("here is a custom button in FLutter"),
            CustomButton(
              onPressed: () {
                print("Tapped Me");
              },
            )
          ],
        ),
      ),
    );
  }
}

 
Source Code
 
Get the complete source code from here.

 
Thanks for reading. Please leave your valuable comments below.

Form Validation in Flutter

$
0
0

Hello friends,

In this article I am gonna show you how you can do Form Validation in a very simple way in Flutter.

Below is the demo of the app we are going to build

App Demo


Watch Video Tutorial


Explanation

Here in this demo, I will have two TextformField and a Button and we will validate them on the press of the button. First we have to wrap the fields inside a “Form” Widget. There is a ‘validator’ function available for all fields inside the “Form”. The ‘validator’ function will return an anonymous function with value of the widget. You can have your won validation inside the function. Then we will create a form key of type GlobalKey<FormState> which will identify a particular form. Then we are going to call formKey.currentState.validate() to validate all the widgets inside the form. If all the widgets are validated, the validate() function will return true else false. There is another function in the formKey to save the values of the form. So when we call formKey.currentState.save(), the onSaved function of each widget gets called.

Let’s get to the code now.

I am gonna show everything at once. here is the whole code

Complete Code

import 'package:flutter/material.dart';

class FormScreen extends StatefulWidget {
  FormScreen();

  @override
  State<StatefulWidget> createState() {
    return _FormScreenState();
  }
}

class _FormScreenState extends State<FormScreen> {
  String name;
  String age;

  final formKey = new GlobalKey<FormState>();

  validateFormAndSave() {
    print("Validating Form...");
    if (formKey.currentState.validate()) {
      print("Validation Successful");
      formKey.currentState.save();
      print('Name $name');
      print('Age $age');
    } else {
      print("Validation Error");
    }
  }

  @override
  Widget build(BuildContext context) {
    return new Scaffold(
      appBar: new AppBar(
        title: new Text('Flutter Form Demo'),
      ),
      body: Form(
        key: formKey,
        child: Padding(
          padding: EdgeInsets.all(10.0),
          child: new Container(
            child: new Column(
                mainAxisAlignment: MainAxisAlignment.start,
                mainAxisSize: MainAxisSize.min,
                verticalDirection: VerticalDirection.down,
                children: <Widget>[
                  TextFormField(
                    keyboardType: TextInputType.text,
                    decoration: InputDecoration(labelText: "Name"),
                    validator: (val) => val.length == 0 ? "Enter Name" : null,
                    onSaved: (val) => name = val,
                  ),
                  TextFormField(
                    keyboardType: TextInputType.number,
                    decoration: InputDecoration(labelText: "Age"),
                    validator: (val) => val.length == 0 ? "Enter Age" : null,
                    onSaved: (val) => age = val,
                  ),
                  RaisedButton(
                    child: Text("Save"),
                    onPressed: validateFormAndSave,
                  )
                ]),
          ),
        ),
      ),
    );
  }
}

All good.
Please leave your valuable comments below.

Thanks for reading…

#Flutter Tutorial – Bottom Navigation Tabs

$
0
0

In this article I am going to show how to implement bottom tabs in Flutter.

Watch Video Tutorial


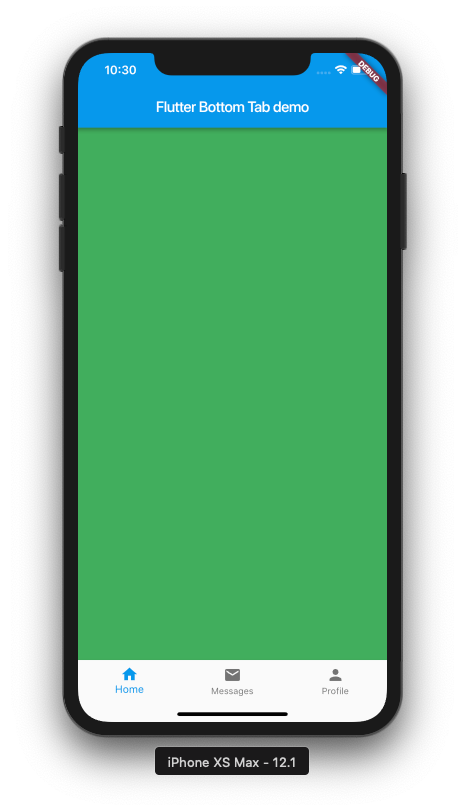
Flutter Bottom Tabs

Flutter Bottom Tabs


Let’s start.

To add a bottom navigation bar in Flutter, you need to have the ‘Scaffold’ widget in the screen. So we will be adding a Scaffold widget as the parent of our screen.


Scaffold

  @override
  Widget build(BuildContext context) {
    return Scaffold(
      appBar: AppBar(
        title: Text(widget.title),
      ),
....


Now we are going to use the ‘bottomNavigationBar’ property of Scaffold.

We will add the ‘BottomNavigationBar’ which takes a list of ‘BottomNavigationBarItem’.
I am adding 3 tabs for simplicity.

Add Tabs

bottomNavigationBar: BottomNavigationBar(
        items: [
          BottomNavigationBarItem(
            icon: Icon(Icons.home),
            title: Text("Home"),
          ),
          BottomNavigationBarItem(
            icon: Icon(Icons.mail),
            title: Text("Messages"),
          ),
          BottomNavigationBarItem(
            icon: Icon(Icons.person),
            title: Text("Profile"),
          )
        ],
      ),

We will write the onTap function for the BottomNavigationBar and set the currentIndex;

 bottomNavigationBar: BottomNavigationBar(
        onTap: onTapped,
        currentIndex: currentTabIndex,
.....

 
Create Tab Screens
 

Let’s create a new file and named it “tab_screen.dart’. For simplicity, the new screen will be extending ‘StatelessWidget’ and UI will have a container and the color of the container will be coming from the main screen when the tabs are added to the bottom navigation bar.

The TabScreen will look like this.

import 'package:flutter/material.dart';

class TabScreen extends StatelessWidget {
  final Color color;
  TabScreen(this.color);

  @override
  Widget build(BuildContext context) {
    return Container(
      color: color,
    );
  }
}

 
Create the List of tabs and Set the CurrentIndex
 

class _TabsDemoScreenState extends State<TabsDemoScreen> {
  int currentTabIndex = 0;
  List<Widget> tabs = [
    TabScreen(Colors.green),
    TabScreen(Colors.orange),
    TabScreen(Colors.blue)
  ];
  onTapped(int index) {
    setState(() {
      currentTabIndex = index;
    });
  }
....

 
Set the tabs


 @override
  Widget build(BuildContext context) {
    return Scaffold(
      appBar: AppBar(
        title: Text(widget.title),
      ),
      body: tabs[currentTabIndex],
......


The Complete Example


import 'package:flutter/material.dart';
import 'tab_screen.dart';

class TabsDemoScreen extends StatefulWidget {
  TabsDemoScreen() : super();

  final String title = "Flutter Bottom Tab demo";

  @override
  _TabsDemoScreenState createState() => _TabsDemoScreenState();
}

class _TabsDemoScreenState extends State<TabsDemoScreen> {
  int currentTabIndex = 0;
  List<Widget> tabs = [
    TabScreen(Colors.green),
    TabScreen(Colors.orange),
    TabScreen(Colors.blue)
  ];
  onTapped(int index) {
    setState(() {
      currentTabIndex = index;
    });
  }

  @override
  Widget build(BuildContext context) {
    return Scaffold(
      appBar: AppBar(
        title: Text(widget.title),
      ),
      body: tabs[currentTabIndex],
      bottomNavigationBar: BottomNavigationBar(
        onTap: onTapped,
        currentIndex: currentTabIndex,
        items: [
          BottomNavigationBarItem(
            icon: Icon(Icons.home),
            title: Text("Home"),
          ),
          BottomNavigationBarItem(
            icon: Icon(Icons.mail),
            title: Text("Messages"),
          ),
          BottomNavigationBarItem(
            icon: Icon(Icons.person),
            title: Text("Profile"),
          )
        ],
      ),
    );
  }
}


And That’s it. Please leave your valuable comments below.
Thank you.

Viewing all 526 articles
Browse latest View live